
Why your homeowners need new baseboards when installing hardwood..
You're getting quotes for hardwood floor installation and one line item keeps appearing: baseboard replacement. You look at your existing baseboards and think, "Those are perfectly fine—can't the contractor just remove them carefully and put them back after the floor is done?"
The short answer is no, not without problems. The longer answer involves floor height changes, decades-old paint and caulk, installation methods that weren't designed for removal, and the reality that "carefully removing baseboards" sounds simpler than it actually is.
After 20+ years installing hardwood throughout Bucks County, Montgomery County, and Philadelphia, we've had this conversation hundreds of times. Homeowners are understandably frustrated when told their baseboards—which look fine and aren't damaged—need to be replaced as part of a flooring project. Here's why baseboard replacement is often necessary, when you can avoid it, and what to expect cost-wise.
The Floor Height Problem: Why Existing Baseboards Are Now Too Short
The most common reason baseboards can't be reused is simple geometry: your new hardwood floor is taller than whatever flooring it's replacing, and your existing baseboards are no longer tall enough to cover the gap between the floor and the wall.
How Floor Height Changes With New Hardwood
When you install hardwood flooring over an existing subfloor, you're adding material that increases the overall floor height. The amount varies based on what you're installing:
3/4" solid hardwood adds 3/4" of height. This is the most common thickness for traditional oak, maple, hickory, and other domestic hardwoods.
5/8" solid hardwood adds 5/8" of height. Some exotic species and prefinished products use this slightly thinner profile.
Engineered hardwood typically adds 3/8" to 1/2" depending on product thickness. Engineered flooring has a hardwood veneer on top of a plywood core, resulting in thinner overall profile than solid hardwood.
Additional underlayment may add 1/8" to 1/4" if sound dampening or moisture barrier is required.
For a detailed explanation on solid vs engineered hardwood flooring, check out our article on these two different types of floors.
If you're removing carpet before hardwood installation, the height change is even more dramatic. Carpet plus padding often measures 1/2" to 3/4" in height. Replacing it with 3/4" solid hardwood means you're going from a soft, compressible surface to a rigid one at approximately the same height—but the visual and functional difference is significant.
Why Baseboard Height Matters
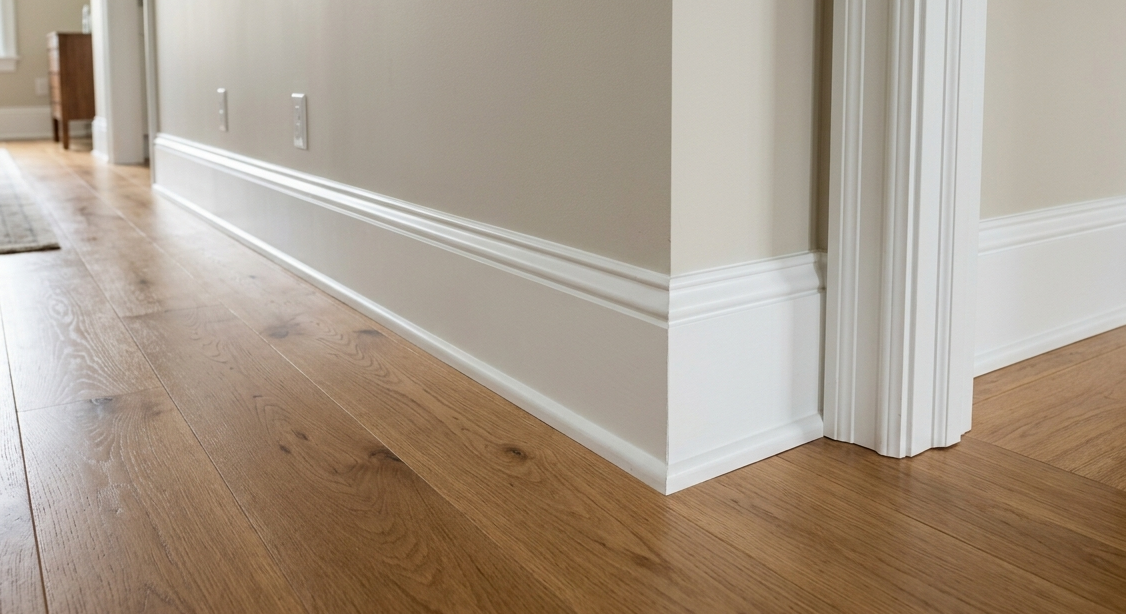
Baseboards serve a critical function: covering the expansion gap between hardwood flooring and the wall. Hardwood expands and contracts with seasonal humidity changes, so proper installation requires leaving 1/4" to 1/2" gap around the room's perimeter. Baseboard hides this gap while allowing the floor to move freely.
Standard baseboard in homes built over the past 50 years is typically 3" to 4" tall (sometimes 5" in older or more formal homes). When installed over the original flooring—whether carpet, vinyl, or older hardwood—these baseboards covered the gap adequately because they extended from the floor surface to the appropriate height on the wall.
Add 3/4" of new hardwood flooring height, and suddenly your baseboards are 3/4" shorter relative to the floor. What was once a 4" baseboard extending from floor to wall is now effectively a 3.25" baseboard sitting on top of the new floor. This creates two problems:
The baseboard looks disproportionately short. A 3" baseboard on a 3/4" raised floor reads as visually stubby and unfinished. The proportions are wrong, and the room feels incomplete even if you can't immediately identify why.
The baseboard doesn't adequately cover transitions and gaps. The expansion gap, shoe molding attachment point, and transition to the hardwood surface all occur in that bottom 3/4" zone. If your baseboard is now too short, these functional elements become visible or problematic.
The Quarter Round "Solution" That Isn't
Some contractors suggest leaving the existing short baseboard and adding quarter round molding to cover the gap at the floor. Quarter round is a small, rounded molding piece that bridges the transition between baseboard and floor.
This technically works—it covers the gap. But it looks like exactly what it is: a band-aid fix to avoid replacing baseboards. Quarter round stacked on top of baseboard creates a visually busy transition with multiple shadow lines and breaks the clean vertical line from floor to wall that proper-height baseboard provides.
In historic homes or period architecture where quarter round was original to the design, it's appropriate. In modern homes or renovations where clean lines are the aesthetic goal, quarter round reads as a shortcut—and buyers, real estate agents, and anyone with design awareness will notice.
The Removal Problem: Why Old Baseboards Don't Come Off Cleanly
Even in cases where baseboard height isn't an issue—for example, when refinishing existing hardwood rather than installing new—removal and reinstallation is far more complicated than homeowners expect.
How Baseboards Are Actually Installed
Baseboards in Pennsylvania and New Jersey homes built over the past 50 years are typically installed using:
Finish nails (15-gauge or 16-gauge) driven through the baseboard into wall studs, spaced 16" to 24" apart. Each nail penetrates 1.5" to 2" into framing.
Construction adhesive applied to the back of the baseboard before nailing, creating a secondary bond to drywall or plaster.
Caulk along the top edge where baseboard meets the wall, sealing gaps and creating a finished appearance.
Paint applied after installation, often multiple coats over years, creating a painted seal between baseboard and wall.
This installation method is designed for permanence, not removability. The combination of nails, adhesive, caulk, and paint creates a bond that resists separation—and when you force separation, something breaks.
What Happens During Baseboard Removal
When removing baseboards installed with the methods above, here's the typical outcome:
Nails tear through the baseboard. As you pry the baseboard away from the wall, the nails either pull through the wood (leaving large holes) or bend and tear the wood as they're forced out. Finish nail holes that were invisible when the baseboard was installed become enlarged, splintered gaps after removal.
Paint seals crack and chip. The painted edge where baseboard meets wall has formed a bond over years. Separating the baseboard cracks this seal, pulling paint chips off both the baseboard and the wall. Even careful removal creates paint damage requiring touch-up or complete repainting.
Caulk tears irregularly. Caulk along the top edge doesn't separate cleanly—it tears in ragged lines, leaving residue on both baseboard and wall. Removing old caulk completely requires scraping and sanding, which damages the baseboard's painted finish.
Adhesive bond rips drywall paper. If construction adhesive was used, the bond between adhesive and drywall is often stronger than the drywall paper's bond to the gypsum core. Pulling off the baseboard tears the paper facing, requiring drywall repair before new baseboard can be installed.
Baseboard warps or splits. Wood baseboards installed for 10-20+ years have acclimated to your home's humidity and temperature. Removing them—especially if they're painted, which seals moisture in—often causes warping or splitting as internal stresses are released.
The "Careful Removal" Myth
Contractors occasionally claim they can remove baseboards carefully for reinstallation. In our 20+ years of experience, the success rate for usable reinstallation is below 25%—and that's with experienced crews using proper techniques.
The reality is that baseboard removal is destructive by nature. You're forcing apart elements that were bonded with nails, adhesive, caulk, and paint specifically to create a permanent installation. "Careful" removal means minimizing damage, not eliminating it.
Even when baseboards physically survive removal intact, they require:
Filling all enlarged nail holes
Sanding damaged areas where paint chipped
Removing old caulk residue
Straightening any warping or bending
Complete repainting (not just touch-up, because patches won't match aged paint)
By the time you pay for these repairs plus labor to reinstall, you're spending 60-80% of what new baseboard would cost—while accepting a result that's still inferior to new material.
When You Can (Sometimes) Reuse Baseboards
There are limited scenarios where baseboard reuse makes sense:
Refinishing existing hardwood (no floor height change): If you're refinishing floors without changing height, and if baseboards are removable without severe damage, and if they need repainting anyway, reuse can work. This is most common when baseboards were installed recently (within 5 years) and haven't been painted multiple times.
Historic or custom baseboards with significant value: In historic Main Line, Newtown, or Philadelphia homes with original wide baseboards (6" to 8"+), crown molding details, or period-appropriate profiles, preservation makes sense even with significant restoration costs. These elements have architectural and monetary value that justifies the effort.
Very recent baseboard installation: If baseboards were installed within the past 1-2 years and haven't been repainted, removal and reinstallation is more feasible. Newer installations have less paint buildup, less adhesive bonding, and less time for wood to acclimate and stress.
DIY projects where labor cost isn't a factor: If you're doing the work yourself and have the skills to repair and refinish damaged baseboards, reuse becomes more economically viable. The material cost savings justify the time investment if your labor is free.
For the majority of hardwood installation projects—particularly in homes 10+ years old with painted baseboards—replacement is the more practical and cost-effective choice.
What Baseboard Replacement Actually Costs
Baseboard replacement cost varies based on material choice, home size, and complexity, but here are realistic numbers for Pennsylvania and New Jersey installations:
Material Costs
Primed MDF baseboard (finger-jointed medium-density fiberboard): $0.60 to $1.20 per linear foot for 3.25" to 5.25" heights. This is the most common modern baseboard material—consistent profile, no knots, takes paint beautifully.
Pine baseboard (solid wood): $1.50 to $3.00 per linear foot depending on width and grade. Pine is traditional and appropriate for historic homes but shows knots and grain that may require extra paint coats for smooth finish.
Poplar baseboard (paint-grade hardwood): $2.00 to $4.00 per linear foot. Harder than pine, no knots, superior paint finish. Often used in higher-end installations.
Prefinished baseboards (factory painted): $2.50 to $5.00 per linear foot. These eliminate painting but limit color choice and require perfect installation since touch-ups show.
Custom profiles (crown cap, ornate molding): $4.00 to $10.00+ per linear foot depending on complexity. Used in historic restoration or luxury homes where period-appropriate details matter.
For a typical 1,500 square foot home with 200 linear feet of baseboard, material costs range from $120 (basic MDF) to $600+ (custom profiles).
Installation Labor Costs
Professional installation includes removing old baseboard, preparing walls, installing new baseboard with proper nailing and adhesive, caulking, and either priming or finish painting.
Basic installation (MDF, simple profile): $2.00 to $3.00 per linear foot for labor.
Standard installation (wood baseboard, multiple rooms): $3.00 to $4.50 per linear foot.
Complex installation (custom profiles, historic restoration, detailed paint work): $5.00 to $8.00+ per linear foot.
For that same 200 linear foot home, labor costs range from $400 to $1,600 depending on complexity.
Total Project Cost
Combining materials and labor:
Budget installation (MDF baseboard, basic profile): $3.00 to $4.00 per linear foot total = $600-800 for 200 LF
Standard installation (primed wood baseboard, professional finish): $5.00 to $7.00 per linear foot total = $1,000-1,400 for 200 LF
Premium installation (custom profiles, historic matching, specialty finishes): $8.00 to $15.00+ per linear foot total = $1,600-3,000+ for 200 LF
These costs are in addition to flooring installation but are necessary to achieve a finished, professional result. Attempting to save $600-1,000 by reusing inadequate or damaged baseboards results in a floor installation that looks incomplete or amateur regardless of the hardwood quality.
Why Contractors Include Baseboard Replacement in Quotes
Experienced hardwood contractors build baseboard replacement into project quotes from the beginning for several reasons:
Prevents mid-project surprises: When clients discover baseboard issues after flooring installation has started, projects stall while decisions are made about replacement. Including it upfront keeps projects on schedule.
Ensures professional finished appearance: We stake our reputation on completed projects that look exceptional. Short, damaged, or poorly reinstalled baseboards undermine even the most beautiful hardwood installation.
Simplifies project logistics: Coordinating baseboard removal, floor installation, and baseboard reinstallation with damaged materials creates scheduling headaches. New baseboard installation is straightforward and predictable.
Protects the new floor: Reinstalling old baseboards often requires on-site repairs—sanding, filling, priming—that create dust and debris that can scratch or damage newly finished hardwood. Installing new primed baseboard is cleaner and safer for the floor.
Provides warranty coverage: When we install both flooring and baseboards, we warranty the complete installation. If we're reinstalling customer-supplied or existing baseboards, warranty coverage becomes complicated.
What Homeowners Should Know Before Starting a Flooring Project
If you're planning hardwood installation in your Bucks County, Montgomery County, or Philadelphia home, here's how to approach the baseboard question:
Budget for baseboard replacement from the start. Assume $3-6 per linear foot as part of your total flooring budget. For most homes, this adds $600-1,200 to the project cost—significant but not project-killing.
Measure your perimeter: Walk your rooms with a tape measure and calculate linear feet of baseboard. This gives you accurate numbers for quote comparison and budgeting.
Understand what you have: Look at your existing baseboards. Are they 3" or shorter? Painted multiple times? Installed more than 10 years ago? If yes to these questions, plan on replacement rather than hoping for reuse.
Ask contractors to explain: When getting quotes, ask specifically about baseboard handling. Contractors who say "we'll just remove and replace them" without discussing condition, height, or repainting costs are either inexperienced or setting you up for mid-project change orders.
Consider timing: If you're planning to repaint the entire room after flooring installation anyway, new primed baseboards make sense—you're painting once rather than repairing and repainting old baseboards.
Think long-term: Baseboard replacement as part of a flooring project is a one-time cost that results in a complete, professionally finished space. Attempting to reuse problematic baseboards saves money upfront but creates an incomplete appearance that bothers you for years.
Our Approach to Baseboard Replacement
At Cyclone Hardwood Floors, we address baseboard replacement as part of every installation consultation:
Honest assessment: We evaluate your existing baseboards and explain whether reuse is feasible or if replacement is necessary. We show you the height issues, paint condition, and installation method so you understand why replacement is recommended.
Material guidance: We help you choose baseboard materials and profiles that match your home's style, your budget, and the aesthetic you're trying to achieve. We explain the difference between MDF, pine, and poplar and when each makes sense.
Complete installation: We handle removal of old baseboards, installation of new baseboards with proper nailing and adhesive, caulking, and priming. This ensures a finished project where all elements work together.
Coordination with painters: If you're hiring a painter for final color coats, we coordinate timing so primed baseboards are ready for painting after floor finishing is complete. If you're painting yourself, we provide guidance on appropriate paint types and techniques.
Protection of new floors: We install baseboards after floor finishing is complete and cured, protecting your investment while completing the final trim work.
The Bottom Line on Baseboards and Hardwood Installation
Baseboard replacement during hardwood installation isn't a contractor upsell or unnecessary expense—it's a practical necessity driven by floor height changes and the reality of removing decades-old trim that was never designed for reuse.
Yes, it adds cost to your project. But attempting to avoid this cost by reusing inadequate or damaged baseboards results in a finished space that looks incomplete or unprofessional, undermining your entire flooring investment.
The difference between a hardwood floor installation with proper baseboards and one with reused, too-short, or damaged baseboards is immediately visible and affects both daily satisfaction and home value. For an additional $600-1,200 on a $10,000-15,000 flooring project, you ensure the final result meets professional standards.
Planning a hardwood installation project in Bucks County, Montgomery County, or Philadelphia?Contact Cyclone Hardwood Floors for a comprehensive consultation that includes honest assessment of baseboard replacement needs. We'll explain your options, provide transparent pricing, and ensure your finished project looks exceptional from floor to ceiling.